
Manual.ly Logo

Vitavia Athena 7000 Manual

0,0 · 0 Bedømmelser

PDF-manual · 56 Sider

Dansk

M: QW-35-FL
side

/ 56

Loading...
9de2b5480c9cdf600cc14f62897b00bb6a2c page 8
8 036.01.1409
7b. SIDE GLAZING
Press glazing seal (7382) into the top groove
in each (7381) and cut to t both ends.
If glazing with 4mm glass, press glazing seal
(6090) onto the aluminium proles (7b.2) and
cut to length. Note - On all horizontal glazing
guides it is recommended to use smaller
lengths of the seal (6090) in the middle of
each eld. This will allow condense water
which collects inside the house to escape.
Note - With Polycarbonate the glazing rubber
is not required.
Through the positioning of the (7050) bolt
head in the different guides in the glazing
capping‘s, it is possible to glaze the green-
house with 4mm,10mm or 16mm panes (7b.2).
Prepare bolts (7050) in each glazing capping
as shown (7b.3).
For 10mm glazing prepare 1 spacer (7407), in
the middle / top of each pane A (7b.4).
Position each glazing pane A into the frame
and connect the vertical capping‘s (7372),
(7373) or (7374) loosely with nuts (7053).
Lift pane A 15mm and connect capping‘s
(7381) loosely under the pane.
Note - The bolts (7050) used to hold the
diagonal braces in sections 1, 2 and 3 should
be replaced at this point (7b.8).
For 10mm glazing prepare 4 spacers (7409)
onto each (7321) and (7322) (2 spacers for
each pane E and F) (7b.5) (7b.6).
Position panes E and F.
Connect capping‘s (7377) or (7378) and then
(7375) / (7379) or (7376) / (7380) loosely.
Tighten all nuts. Please do not over tighten.
Note - The vertical capping‘s can be best as-
sembled when the bottom bolt is rst inserted
into the hole, then the middle and nally the
top bolt. Ensure that the capping remains in
contact with the sill bar.
8. FINAL STEPS
Insert eave plastic (7370) and (7371) into both
ends of the eave bar (7324 - 7327) (8.1).
Note - It can help to pull the eave bar at the
top edge, carefully away from the house so
that the opening for the plastic becomes lar-
ger.
Insert cropped head bolt (1412) into the bolt
channel at the bottom of corner bar (7310) and
connect parts (1405) and (1409) with alumini-
um nut (1002) on both sides (8.3). Fit elbow
(1402) onto the bottom of down pipe (1415)
(8.6) and then connect this to the eave plastic
(7370) or (7371) (8.11). Fit the down pipe
clamp (1403) around the down pipe and con-
nect to (1409) (8.4). Insert screw (1006) to x
the down pipe in place (8.5).
Slide the roof vent into the correct section from
one end of the house (8.7). Attach the roof
vent xer (7369) using the prepared holes and
self-drilling screw (7349) on both sides of the
roof vent (8.8) (8.9).
Assemble door track (7359) into the door ope-
ning. Connect to (7321), (7322) or (7324 -
7327) by inserting bolts (7052) into the bolt
channel on the outside of these bars and con-
nect with nuts (7053) (8.10).
Include at both ends of door track bar (7359)
bolt (7052) from outside and nut (3002) inside
the door guide to prevent the door from sliding
out of the track (8.10) (8.11).
Position the doors by inserting the plastic door
guides (2271) into the guide in door track bar
(7359) (8.12) (8.13a) and then lower the
wheels onto the door track on bar (7351)
(8.13b). Hook the door jump clips (7350) under
the lip on (7351) and tighten the lock nuts
(7360) (8.13b).
Connect plastic nut caps (6070) by pushing
them onto all visible nuts (7053) inside the
building (8.14).
Note - It is recommended to include a bead of
neutral silicone between the ridge bar and wall
from outside (8.9b). Neutral silicone is not
provided.
FINISHING
If desired, it is possible to further seal the
greenhouse at the edges using neutral silicone.
Silicone is not included for this purpose.
Place the warning label inside the house.
Please check the tightness of all nuts and
bolts 2 weeks after completing the assembly.
A full range of greenhouse accessories, to
help you make the most of this product, is
available from your stockist. Please inform
yourself as to the possibilities.
SAFETY NOTICE
In the event of high wind conditions, close the
doors and all vents.
In the event of heavy snowfall, clear the roof of
the building or take suitable measures to sup-
port the roof. Heat the building in winter.
COMMENTS
For the complete protection of your new
green house, we advise you to include it in
your house insurance. Please take note of
possible building rules relating to the positio-
ning of greenhouses.
Please stick the included greenhouse model
label onto door bar (7352) or (7353) after
success fully assembling this product. This
information is important in the event that re-
placement parts are later required.
Please keep these assembly instructions in a
safe place, for future reference!
Our policy is one of continuous improvement
and we reserve the right to change the speci-
cations without prior notice.

Chat med din Vitavia Athena 7000 manual ved hjælp af AI

Få øjeblikkelige AI-svar fra din Vitavia Athena 7000 manual

Spørg om alt vedrørende Vitavia Athena 7000. Svarene kommer fra denne manual med henvisning til de sider, de er baseret på.

Athena 7000 Vedligeholdelsesplan

Lejlighedsvis
Vask drivhuset med mildt rengøringsmiddel

Vask drivhuset grundigt lejlighedsvis ved hjælp af et mildt rengøringsmiddel. Sørg for, at rengøringsmidlet ikke reagerer aggressivt med aluminium eller plast.

Vis i manualen (side 6)
Regelmæssigt
Rengør dørsporene

Sørg for, at dørsporene rengøres regelmæssigt for at undgå ophobning af snavs.

Vis i manualen (side 6)
Efter samling
Kontroller stramningen af møtrikker og bolte

Kontroller venligst stramningen af alle møtrikker og bolte 2 uger efter, at samlingen er afsluttet.

Vis i manualen (side 8)
M: qwen/qwen3.8-flash

Stil et Spørgsmål

0/1000

Anbefaler du Athena 7000?

Ja Nej

Ofte stillede spørgsmål

A

Du har brug for skruetrækkere, en gummihammer, stiger, nøgler, en kniv, en målestok, et vaterpas og en accu-bor med justerbar drejningsmoment.

Er dette svar nyttigt?

A

Ja, Vitavia Athena understøtter flere glaseringstyper herunder 4mm glas, 10mm polycarbonat og 16mm polycarbonat afhængigt af modelkonfigurationen.

Er dette svar nyttigt?

A

Nej, fundamentet er ikke inkluderet. Du skal konstruere en solid base ved hjælp af beton, murværk eller stenarbejde selv før montering starter.

Er dette svar nyttigt?

A

Kondens kan reduceres ved at udskifte specifikke dele som (7424/7425) med (7423*) for at øge den indvendige ventilation, især i polycarbonat modeller.

Er dette svar nyttigt?

A

Ja, forankring af væksthuset er obligatorisk for sikkerhed og stabilitet, især mod vindbelastninger og for at overholde forsikringskrav.

Er dette svar nyttigt?

M: QW-35-FL

Fordele og Ulemper

Fordele

  • Holdbar aluminiumsramme konstruktion sikrer langvarig ydeevne
  • Versatile glasering muligheder understøtter både glas og polycarbonat paneler
  • Skydedør design giver bekvem ind- og udgang
  • Tagventiler giver fremragende naturlig ventilation og temperaturkontrol
  • Detaljerede monteringsinstruktioner forenkler bygningsprocessen
VS

Ulemper

  • Kræver et perfekt vandret og kvadratisk fundament for korrekt installation
  • Montering kræver typisk to personer for sikkerhed og effektivitet
  • Neutral silikone til tætning er ikke inkluderet i pakken
  • Kondens kan opstå med polycarbonat uden specifikke ventilationsjusteringer
  • Fundament materialer er ikke leveret og skal skaffes separat
M: QW-35-FL

Produkt Specifikation

Glasning

Polykarbonat 10 mm (hule kammerpaneler), sikkerhedsglas 3 mm (enkelt lag)

Ramme

Aluminium

Farve

Sølv

Areal

6,90 kvm

Funktioner

1 tagvindue, regnvandssamler, låsbar

Dør

Dobbelt skydedør

Dimensioner (LxBxH)

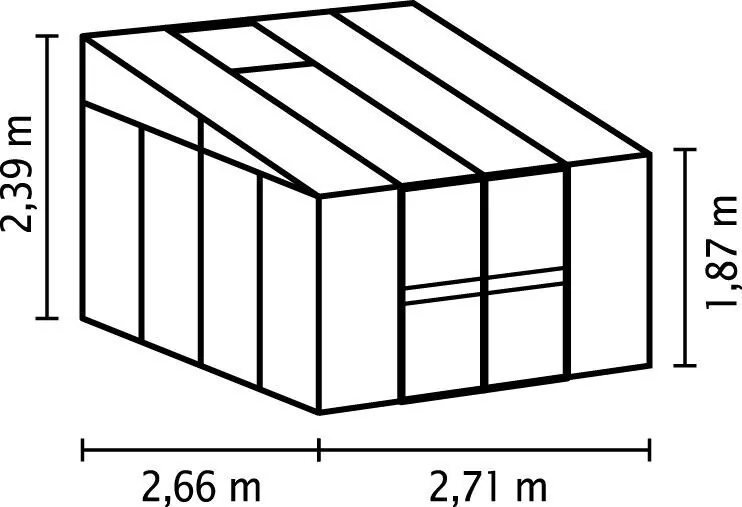
2,66x2,73x2,39 m

M: QW-35-FL

Produkt Beskrivelse

Vitavia Athena 7000 ESG/HKP Væksthus alu Manual

Vitavia Athena 7000 er et robust og elegant væksthus designet til seriøse gartnere, der kræver holdbarhed og stil. Konstruktionen af høj kvalitet aluminium giver denne struktur exceptionel styrke samtidig med at den opretholder et slankt, moderne æstetik, der supplerer enhver have. Manualen tjener som din omfattende guide til at låse op for produktets fulde potentiale, så du kan montere det med tillid og præcision.

Montering begynder med omhyggelig placering. Det er afgørende at vælge en lokation, der modtager rigeligt sollys, mens den er beskyttet mod stærk vind. En solid grund af beton, mursten eller sten anbefales for at sikre stabilitet og levetid. Fundamentet skal være perfekt vandret og kvadratisk, før du begynder at placere ramme komponenterne. Sikkerhed er altafgørende under byggeprocessen; bær altid beskyttelsesudstyr som handsker og briller, når du håndterer aluminium profiler, glas eller polycarbonat ark.

Vitavia Athena har et skydedørssystem, der giver nem adgang til dine planter. Rammen samles sektion for sektion, startende med front elementer og gavle. Instruktionerne detaljerer, hvordan man forbinder side elementer, installerer tag midterbjælker og passer tagventiler for optimal klimastyring. Uanset om du vælger at glasere enheden med 4mm glas eller forskellige tykkelser af polycarbonat, den fleksible design imødekommer begge materialer problemfrit. Korrekt tætnings med neutral silikone anbefales for at sikre, at væksthuset forbliver vejtæt.

Vedligeholdelse er ligetil, men essentiel for at holde dit væksthus i topstand. Regelmæssig rensning af sporene og rammerne forhindrer affaldsophobning, hvilket kunne hæmme den glatte drift af døre og ventiler. Tjek periodisk alle møtrikker og bolte efter to ugers brug for at sikre, at de forbliver stramme. Ved at følge disse retningslinjer fundet i Vitavia Athena 7000 ESG/HKP Væksthus alu Manual, vil du skabe et trivende miljø for dine planter i årene fremover.

M: QW-35-FL

© Copyright 2026 Manual.ly
